
Instrument approach procedures fall into three official categories: Precision (PA), Approach with Vertical Guidance (APV), and Non‑Precision (NPA). The category tells you whether you fly to a Decision Altitude or a Minimum Descent Altitude, and that single distinction drives almost every decision you make in the final two minutes of an approach. The FAA Instrument Rating ACS expects you to know the difference cold, and at Parrillo Air Services, that's the first mental model instructors build before students ever brief a real chart.
TL;DR:
- The choice between DA and MDA determines whether you make a single go/no-go decision or level off and continue searching visually, directly impacting approach safety.
- Equipment certifications like WAAS or Baro-VNAV dictate which minima lines, such as LPV or LNAV/VNAV, are legally available for your aircraft.
- Weather factors like ceiling, visibility, and approach lighting systems influence which approach type, minima, and procedures are safe to fly at any given time.
- Recognizing approach segments and triggers, especially the decision points at DA or MDA, is critical for maintaining safety and passing certification standards.
- Modern approaches increasingly rely on satellite-based systems like RNAV and RNP, requiring pilots to understand newer minima and approach classifications beyond traditional ground-based systems.
Every instrument approach procedure in the United States gets sorted into one of three buckets by TERPS, the design criteria the FAA uses to build every published approach. The FAA AIM's chapter on approach types spells out the three categories with textbook examples: Precision Approaches include ILS, GLS, and PAR. Approach with Vertical Guidance covers LPV and LNAV/VNAV. Non‑Precision Approaches include VOR, NDB, and LNAV.
The category is not cosmetic. It determines whether the approach provides an electronic glidepath and, more importantly, whether you fly to a DA or an MDA.
A Precision Approach gives you both lateral and vertical guidance from a certified electronic source, usually a glideslope. You fly it to a Decision Altitude, meaning you make a single go/no-go decision at one specific point. Either the runway environment is in sight and you continue, or it isn't and you're already moving the controls toward the missed approach.
An APV approach also provides vertical guidance, but that guidance comes from something other than a traditional ILS glideslope, typically satellite-based augmentation or barometric computation. LPV and LNAV/VNAV approaches fall here. They're flown to a DA just like a precision approach, and LPV in particular was built to feel like flying a Category I ILS. TERPS keeps it classified as APV rather than PA because the vertical guidance source isn't a ground-based precision system.
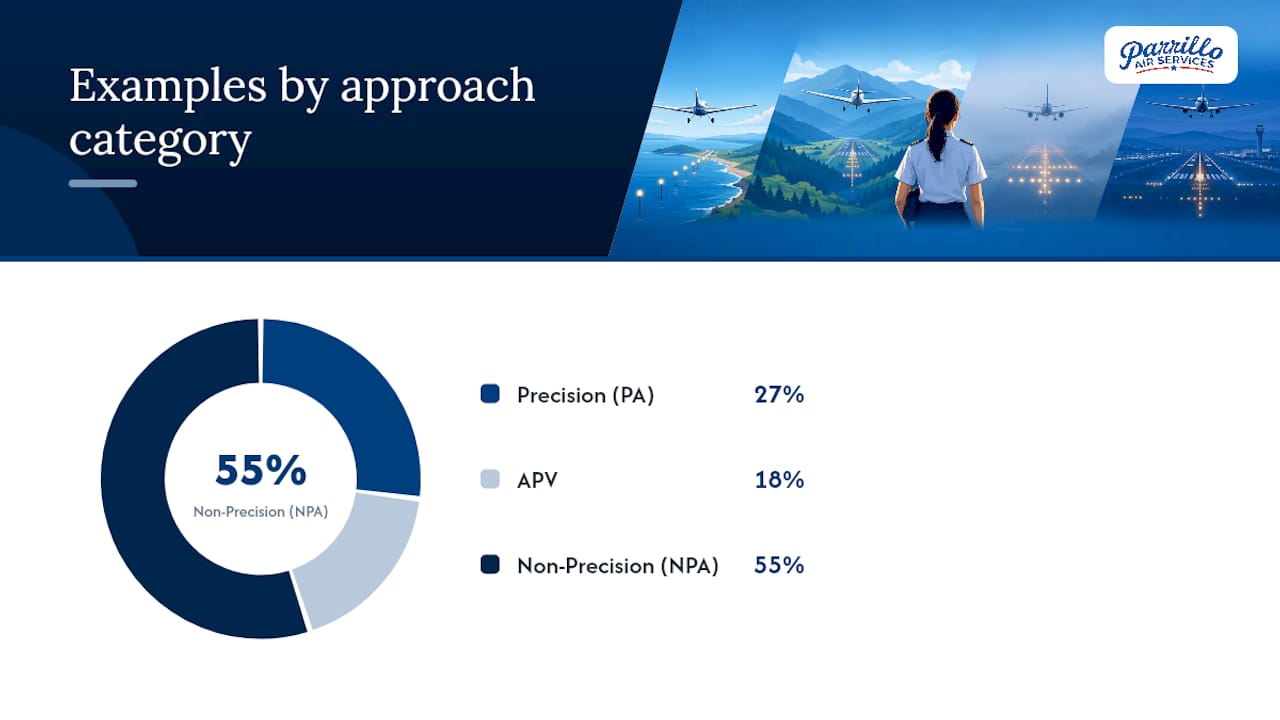
A Non‑Precision Approach gives you lateral guidance only, no electronic vertical path. You fly to a Minimum Descent Altitude and level off there, no lower, until you either see the runway environment or reach the missed approach point. One detail that trips up new instrument students: adding a Vertical Descent Angle (VDA) to an NPA chart, which many RNAV charts now include as an advisory glidepath, does not convert it into an APV. It's still an NPA. It's still an MDA. The angle is a suggestion for a stabilized descent, not an approved vertical guidance signal.
Here's how the three categories break down in practice:
Quick fact: the FAA Instrument Procedures Handbook treats the DA versus MDA distinction as the core operational difference across every approach type, more consequential to the pilot in the moment than the sensor generating the guidance.
Once you understand the three categories, the next step is learning to recognize the specific approach types you'll actually fly and study for the checkride. Each has its own quirks.
ILS (Instrument Landing System). The workhorse precision approach. A localizer gives lateral guidance, a glideslope gives vertical guidance, and you fly to a DA/DH, commonly 200 feet above the runway with a half-mile visibility requirement for Category I. Marker beacons or DME substitute for the outer marker on many modern charts. When your instructor says "fly it to minimums," an ILS is almost always the training baseline because the sensitivity and cockpit workflow transfer directly to LPV approaches later.
GLS (GBAS Landing System). Ground-Based Augmentation System approaches are rare outside a handful of larger airports, but they behave like an ILS from the flight deck: DA, precision-quality guidance, just generated by a ground station broadcasting corrections to GPS rather than a glideslope antenna. You likely won't fly one in initial training, but you should recognize the acronym on the knowledge test.
PAR (Precision Approach Radar). A controller talks you down using radar-derived azimuth and glidepath information, no cockpit avionics involved beyond a radio. Largely a military and select civil/joint-use field procedure today, but still a PA category by definition.
RNAV (GPS) approaches. This is where most modern instrument training happens, and where chart literacy matters most. A single RNAV (GPS) approach chart can carry up to four separate lines of minima:
RNP and RNP AR. Required Navigation Performance approaches demand tighter containment and, for RNP AR procedures, specific aircraft authorization and often specialized crew training, because they can include curved (RF) legs and reduced obstacle clearance margins that ordinary RNAV approval doesn't cover.
Conventional lateral-only procedures. VOR, NDB, LOC (a localizer flown without the glideslope), SDF (Simplified Directional Facility), and LDA (Localizer-type Directional Aid, sometimes offset from the runway centerline) round out the NPA family. They're less common at busy airports now but still show up on the instrument checkride and in real-world flying at smaller fields.
Pro Tip: Don't memorize approach names in isolation. Pair each one with its minima type (DA or MDA) as you study; that pairing is what actually changes your hand-flying and decision-making, not the acronym on the chart title.
Every instrument approach procedure, from a full ILS at a Class B airport to a simple GPS overlay at a grass strip, breaks down into the same five structural segments. Understanding them turns a busy approach plate into something you can brief in under a minute.
The chart tells you exactly where each trigger point sits. On a precision or APV approach, the DA/DH is printed directly on the profile view, often in a boxed altitude with the required visibility beside it. On an NPA, the MDA appears the same way, but you'll also see the MAP defined by distance (often DME or GPS distance from the FAF) rather than by a single altitude crossing.
| Segment | Starts at | Ends at | Key action |
|---|---|---|---|
| Feeder | En route fix | IAF | Transition, descent planning |
| Initial | IAF | Intermediate Fix | Course reversal if required (procedure turn/HILPT) |
| Intermediate | Intermediate Fix | FAF | Configure aircraft, stabilize |
| Final | FAF (or glideslope intercept) | MAP or DA/DH | Fly to minimums, decide |
| Missed | DA/DH or MAP | Published fix/hold | Climb, navigate, communicate |
A procedure turn or HILPT exists purely to reverse your course and establish inbound alignment; skip it only when ATC vectors you onto the final course or radar monitoring makes it unnecessary, and always confirm which applies before you fly.
The single most important operational distinction in instrument flying is the difference between a Decision Altitude and a Minimum Descent Altitude, and the FAA Instrument Procedures Handbook is blunt about why it matters.
At a DA/DH, used on precision and APV approaches, you make one decision at one altitude. If the required visual references are there, you continue. If not, you're already initiating the missed approach, because momentum carries you slightly below DA during the transition regardless.
At an MDA, used on non-precision approaches, you level off at the published altitude and hold it. You cannot descend below MDA until you have the required visual references AND you're at a position from which a normal descent to landing is possible. If you reach the MAP without both conditions met, you go missed, no exceptions.
Confusing DA and MDA logic is one of the most common instructor corrections in the airplane: students trained mostly on ILS approaches sometimes try to "decide and go" at MDA the way they would at DA, when the rule actually requires a level-off and a continued look, not a single trigger point.
The approach title printed at the top of a chart tells you almost nothing about what you're legally allowed to fly. The minima line you're authorized to use, based on your avionics and their certification, is what actually matters.
A breakdown of aircraft differences training and regulatory approvals across FAA, EASA, CAA, and Transport Canada makes the same point from the training side: equipment authorization, not pilot preference, decides which procedure you're cleared to fly.
Pro Tip: Before you even glance at the approach title, check your GPS annunciator and your aircraft's AFM supplement. If it doesn't say WAAS/LPV approved, that line on the chart isn't yours to fly, even if it's printed right there in front of you.
This is the habit that separates confident instrument students from ones who get surprised in the airplane: read the minima lines first, then match your equipment against them, and only then does the approach title become relevant.
The FAA Instrument Rating ACS is not vague about approach requirements. You need to demonstrate both a non-precision and a precision or APV approach, at least one without vector assistance, plus a circling approach and at least one missed approach executed from an actual or simulated missed approach point.
Study priority should mirror that weighting. Spend real time on approach briefings until they're automatic, then drill missed approaches from every category (precision, APV, and non-precision) until the transition from "descending" to "climbing and navigating" happens without hesitation. A guide to the instrument flying skills the ACS evaluates breaks down the specific maneuver standards in more depth if you want the full task list.
A tight pre-approach briefing prevents most of the mistakes that show up in the training environment. Verify the approach identifier and frequency, note the DA/DH or MDA and required visibility, confirm the missed approach heading and altitude, and check your equipment authorization against the minima line you plan to fly.
The most common dual-training correction is a student treating MDA like a DA, initiating a climb the instant they cross the MAP instead of confirming the runway environment first. Approach training often includes simulator work before dual flights, building chart familiarity and briefing habits before workload and turbulence get added to the mix.
Pro Tip: Log every approach type you fly, not just the ones you're comfortable with. A logbook with ten ILS approaches and zero LPV or circling approaches will not prepare you for a checkride that expects range across categories.
An ILS is always a Precision Approach, but Category I, II, and III versions of that same ILS carry dramatically different minima, and student pilots training for the instrument rating almost exclusively fly Category I.
Category I is the standard ILS most GA pilots train on: a DA around 200 feet above touchdown zone elevation with a minimum visibility typically near half a mile, depending on the specific procedure and lighting available. This is the version referenced throughout Instrument Rating ACS training and the version you'll fly on your checkride.
Category II lowers the DH to around 100 feet with reduced visibility requirements, but it demands additional ground infrastructure, aircraft certification, and pilot authorization beyond a standard instrument rating.
Category III goes further still, with Category IIIc theoretically permitting zero-visibility landings, though in practice most Category III operations retain some minimum visibility or rollout guidance requirement. These procedures require autoland capability, specific crew qualification, and airport equipment far beyond anything in Part 61 instrument training.
For a student pilot, the practical takeaway is simple: every ILS you fly during instrument training is Category I. Category II and III exist in the airline and corporate world, tied to specific aircraft certification and airport infrastructure, and they're worth recognizing on the knowledge test even though you won't fly them until well into an airline career.
Weather doesn't just determine whether you can land. It often determines which approach you're even allowed to attempt.
Ceiling and visibility get compared directly against the published minima for each approach type, and different approaches at the same airport frequently carry different minima. An ILS might offer a 200-foot DA and half-mile visibility, while the VOR approach to the same runway might require a 500-foot MDA and a full mile. On a marginal day, that gap decides which approach you brief.
Crosswind and gusty conditions matter more on non-precision approaches than precision ones, because leveling off at MDA and hunting visually for the runway leaves less margin for correction than a stabilized DA-based descent. Icing conditions can eliminate certain approaches entirely if the aircraft isn't certified for known icing and the freezing level sits inside the approach path.
Circling approaches deserve particular weather caution. Circling minima are almost always higher than straight-in minima for the same procedure, precisely because maneuvering visually around the airport at low altitude in reduced visibility carries more risk than tracking a stabilized final course. On a day with a low ceiling and circling required, many pilots reasonably choose to wait rather than fly it, even when the numbers technically permit it.
The practical habit worth building early: check the actual weather against the specific minima for the specific approach you plan to fly, not a generic sense of "good enough." A guide to reading METAR and TAF reports before every flight gives you the raw data to make that comparison correctly.
Approach lighting systems exist to give you the visual cues you need at the exact moment your electronic guidance runs out, and they directly affect the minima published for a given runway.
ALSF-2 (high-intensity approach lighting with sequenced flashers) and MALSR (medium-intensity approach lighting with runway alignment indicator lights) are the systems most commonly paired with precision approaches at larger airports, and their presence often allows lower visibility minima than the same approach would have without them. Simpler systems like ODALS (Omnidirectional Approach Lighting System) support lower visibility credit at smaller non-precision airports.

The regulatory link is direct: FAA visibility credit rules allow reduced minimums specifically because approach lighting gives pilots the visual segment transition they need at DA or MDA, even when the ambient visibility is marginal. That's why the same runway can show different minima on days when the approach lights are inoperative versus fully functional, and why a NOTAM reporting lights out of service can push your required visibility up significantly.
For training purposes, recognize what lighting system serves your home airport's runways and how it correlates to the minima printed on your local approach charts. It also matters during the visual segment itself: seeing the approach lights before the runway environment is fully in sight is normal and expected, and understanding that sequence, lights first, runway markings and threshold second, keeps you from either descending prematurely or hesitating too long once you actually have the required references.
A straight-in approach lines you up with the landing runway from the final approach course all the way to touchdown. A circling approach lands you on a runway that isn't aligned with your final approach course, requiring visual maneuvering after you reach the minima to position for landing.
Circling comes into play when the approach itself only serves one runway direction but wind, traffic, or runway condition favors a different one at the airport. You fly the published approach to its MDA (circling approaches are always flown to an MDA, never a DA, since visual maneuvering can't be tied to a single decision point), then maneuver visually while staying within the protected circling area for your aircraft's approach category.
The skill demand is different, not just harder. Straight-in flying is primarily instrument precision: holding course and altitude on needles. Circling adds visual maneuvering at low altitude, judging a traffic-pattern-style transition while referencing the airport rather than instruments, often in reduced visibility that makes the runway environment harder to keep in sight throughout the maneuver.
This is exactly why circling minima run higher than straight-in minima for the same procedure and why the ACS requires you to demonstrate one during your checkride. Instructors typically introduce circling late in training, after straight-in approaches are solid, because it demands confident instrument skills as a foundation before adding the visual workload on top.
RNAV and RNP procedures have already reshaped the approach landscape more than any other development in the past two decades, and that shift keeps accelerating. Satellite-based approaches let airports without ground-based ILS infrastructure offer near-precision minima through LPV, which matters enormously for smaller fields that could never justify the cost of a full ILS installation.
RNP AR procedures, with their curved paths and reduced obstacle margins, are expanding into more terrain-challenged airports where conventional straight-line approaches simply can't clear obstacles safely. That trend pushes more operators toward RNP authorization and the training that comes with it.
EFVS, enhanced vision systems that let qualified operators see through low visibility using infrared or similar sensor imaging, are moving from a mostly business-aviation tool toward broader adoption as equipment costs come down. For students, none of this changes the fundamentals, DA and MDA logic stays the same, but it does mean the specific approach types available at any given airport will keep shifting toward satellite-based procedures.
The practical implication for training: instrument students today spend more time on RNAV (GPS) approaches and chart-reading across multiple minima lines than instrument students a generation ago, because that's genuinely what's being flown in the field now.
Approach training works best when chart literacy comes before workload, which is why the sequence matters as much as the flying itself. Building recognition of DA versus MDA logic, minima lines, and missed approach triggers in a low-stress setting first means a student walks into the airplane already knowing what to look for rather than discovering it under pressure.
That's the sequencing philosophy behind how approach instruction gets structured: simulator familiarity with chart reading and briefing habits, then dual flights that add real workload, turbulence, and radio traffic on top of skills already rehearsed. The goal isn't just passing a checkride. It's building a pilot who reads a minima line correctly before ever touching the yoke.
Missed approach competency gets the same weight as landing competency, because the ACS treats both as equally testable skills, and because in real flying, the missed approach is the maneuver that actually keeps you safe on the bad-weather day.
— Gm
Learning to read a minima line correctly, brief an approach from memory, and fly a clean missed approach isn't something you pick up from a chart legend alone. It takes structured, personalized flight time with an instructor who adjusts pace to how you actually learn, not a fixed classroom schedule.

Parrillo Air Services builds its Instrument Rating program around exactly that kind of personalized instruction, with flexible scheduling and simulator-supported preparation before you're managing full workload in the airplane. If you're still deciding whether the instrument rating is your next step, a Discovery Flight at $199 gives you real time with an instructor and a firsthand look at how training is paced here, and program pricing details, including the $165 hourly aircraft rental fee and $55 hourly instruction fee, are laid out for anyone comparing training costs before committing. Reach out to schedule a discovery flight or ask admissions about instrument rating start dates.
For the exact regulatory language behind everything covered here, three FAA documents are worth bookmarking. The FAA AIM, Chapter 5, Section 4 covers approach type definitions and TERPS classifications directly. The FAA Instrument Procedures Handbook explains procedure design, DA versus MDA logic, and EFVS guidance in more depth. The FAA Instrument Rating ACS spells out exactly what an examiner will expect you to demonstrate.
A guide to FAA instrument flying skill requirements — flight hour minimums, ACS maneuvers, English proficiency, currency rules, and IPC restoration.
The music, circular, inverted-V and T scans, glass cockpit scanning, common scan errors, and a realistic practice plan for the FAA IPC.
A complete guide to FAA instrument rating training requirements under Part 61 and Part 141, covering flight experience, testing, and efficient training strategies.